
In this article, we are going to explain the most of the geometry tools of staad pro. This tutorial includes the full explanation of geometry tools with images.
It is a series of Staad pro, Beginner to Advance. Geometry tools bars explanation is the third part of this series. In previous lectures of staad pro, we discussed about stadd pro configuration settings and how to create new models in staad pro step wise.
If you missed the previous tutorials, than first go and learn the staad pro from beginning. And also, don’t forget to comment about this series. Let’s start.
Table of Contents
Staad Pro – Geometry Tools Bar
Basically Geometry tools bar is divided into 7 (Seven) nos of tabs which is listed below.
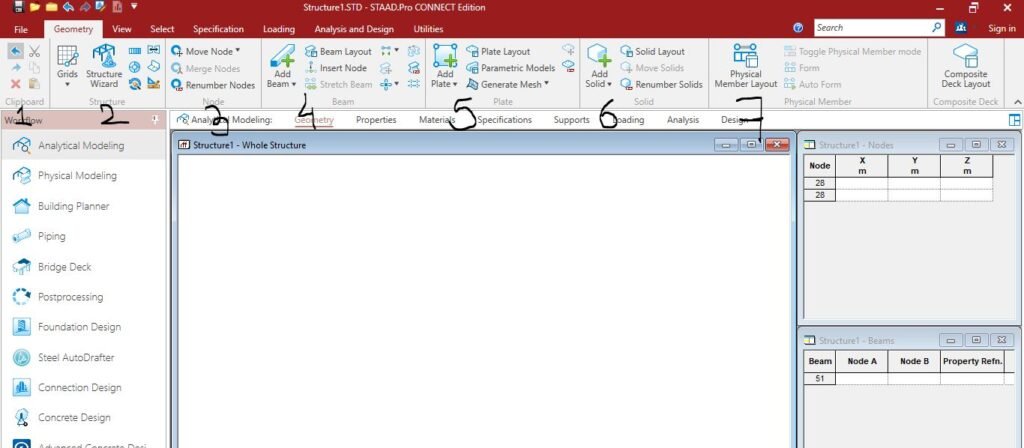
- Clipboard
- Structure
- Node
- Beam
- Plate
- Solid
- Physical Member
- Composite Deck
This seven tabs includes the all geometry tools of staad pro for creating a analytical model. Lets understand the uses of all tools as per tabs line-wise.
Also Read: Staad Pro Configure Settings and | Staad Pro Tutorial – 1
1. Clipboard
Clipboard tools are very important and most used tools to create any geometry. Clipboard tools name and its uses are listed below.
- Undo : Undo tools is used to reverse the step that you done. Undo is very useful tool, i think all of you must know about it and its importance. If anything done wrong, Undo tools help to reverse back your last work. The Shortcut for Undo tool in staad pro is Ctrl + Z.
- Redo : Redo tool is used to recover your last move or deleted work. Redo tool is also most popular tool. It is used to forward the step that you done. If you completed any work and you realize that model is wrong than you reversed commands until the previous correct model but than if you realize the model is right than Redo tools helps to recover your model or last command move. The Shortcut for Redo is Ctrl + Y
- Delete : Delete tool is used to remove anything.
- Cut : Cut tool is used to remove and paste the node, beam or whatever your work. The shortcut for cut tool is Ctrl + X
- Copy : Copy tool is used to duplicate or replicate the work that you done. The Shortcut for Copy Tools is Ctrl + C.
- Paste : Paste tool is used to create multiple geometry work that you done by just a click. Paste tool is used in a combination of Copy and Paste or Cut and Paste. The Shortcut for Paste tool is Ctrl + V.
Also Read: Creating a New Analytical Model in Staad Pro | Staad Pro Tutorial – 2
2. Structure
Structure tab tools are listed below.

- Grid : Grid tool help to create model using same interval grids. If your model is simple than this tools save your time. Grid is a set of lines at equal or unequal distance. Intersection of grid lines is act as a point where you locate your nodes point. Its includes grids for beam or plates.
- Structure Wizard : Structure Wizard tool includes the Predefined Structure and other option from which you can create structure by just some inputs an than import in the staad pro. Its save your time if your structure is similar to predefined models of structure wizard. we explain use of it in upcoming tutorials.
- Translation Repeat : Translation Repeat tool is used to replicate beam, nodes or plate in particular direction at define intervals by giving few inputs. The full explanation of this tool we understand in Upcoming tutorials.
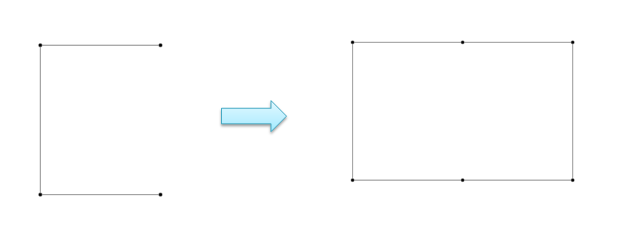
- Mirror : Mirror tool is used to mirror the structure in particular plan. Mirror tool provides facility of Move or Copy the model. The Practical uses of this command will explain in upcoming tutorials. One simple example of mirror command is shown in below.
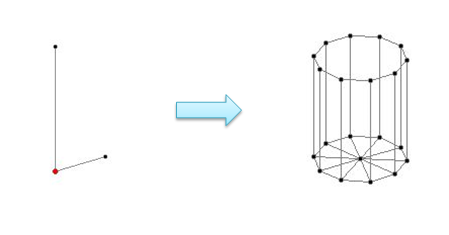
- Circular repeat : Circular Repeat tool is used to create circular structure such as water tank, manhole, UG Sump, etc structure. Circular repeat tools replicate the beam, nodes or plate in circular periphery. The Example of circular repeat tool is shown below.
3. Node
The tools of node in geometry tab is listed below with its uses.
- Move Node : As per name this tool shows its uses. Move Node tool is used to move the nodes from one point to another point. I used this tool to stretch beam without loosing any property.
- Merge Node : Merge Node tool is used to combine the duplicate nodes.
- Renumber Node : Renumber Node tool is used to reset the number of nodes from origin, etc.
Also Read: Different types of load on Building
4. Beam
The tools of beam tab is listed below.
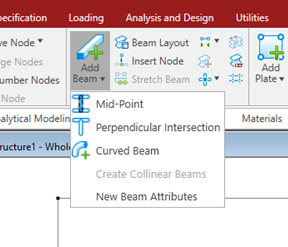
- Add Beam : Add beam tool is used to create beam between two nodes. Add beam tool includes three important option, 1. Mid Beam, 2. Perpendicular Beam, 3. Curved Beam. Mid beam tool was used to create beam between beam of two parallel beam. Perpendicular beam tool is used to create perpendicular beam between one node point to another beam . Curved beam tool is used to curved beam as per radius of curvature.
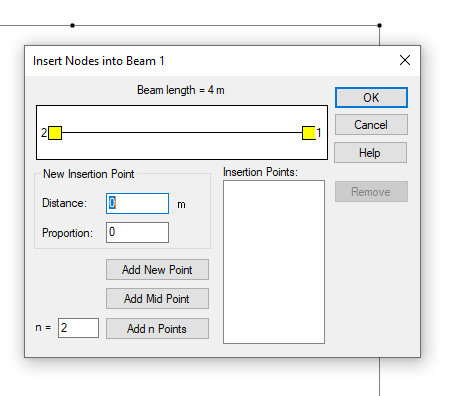
- Insert Node : Insert Node tool is used to add node in a beam at particular distance or mid of beam.
- Connect Beam : Connect beam tool is used to create beam between node in particular direction using just one click.
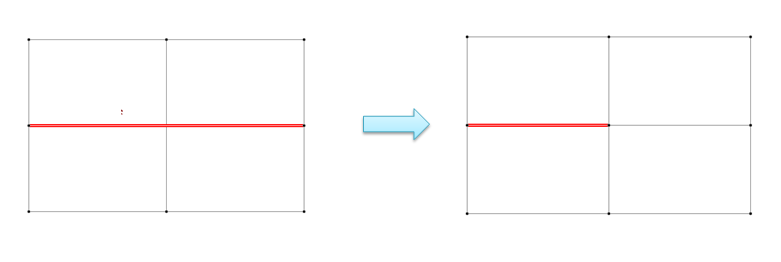
- Intersect Selected : Intersect selected tool is used to break the crossing beam.
- Merged Selected Beam : Merged selected beam tool is used to merge the two beams.
- Break Beam : Break Beam tool is used to break the beam using nodes.
Also Read: Development length of bar for Beam
5. Plate
The Plate geometry tools are listed below with their uses.
- Add Plate : Add plate tool was used to crate plate element in staad pro. Its includes two option, First one is Triangular Plate which is used to create triangular plate element, second one is Infill Plate which is used to fill plates between beam mesh.
- Generate mesh : Generate mesh tool is used to create meshing in plate element for a proper FEM Analysis (Finite Element Method). In case of RCC Structure such as RCC Wall, Retaining wall or other structure, the created plate was meshed into small plates to obtain a contour result of moment, shear force, or stress. From that we check and provide reinforcement as per requirement of particular meshed area.
We explained only the very important and most of time used geometry tools.
Also Read: What is Pedestal in Column Footing

I am a Professional Civil & Structural Engineer having more than 4 years of experience in Engineering, Procurement and Construction industry. Here i sharing the latest updates of EPC Projects and Construction News.