

In this Article, We explained the Shrinkage limit test for soil, shrinkage limit test apparatus name, Aim, Shrinkage limit test procedure, the definition of shrinkage limit, Shrinkage ratio, Practical utility of shrinkage limit test, and so more. Read the article till the end.
Table of Contents
Determination of Shrinkage Limit Test For Soil
Aim of Shrinkage limit test:
- To determine shrinkage limit, shrinkage ratio and volumetric shrinkage of expansive nature soil.
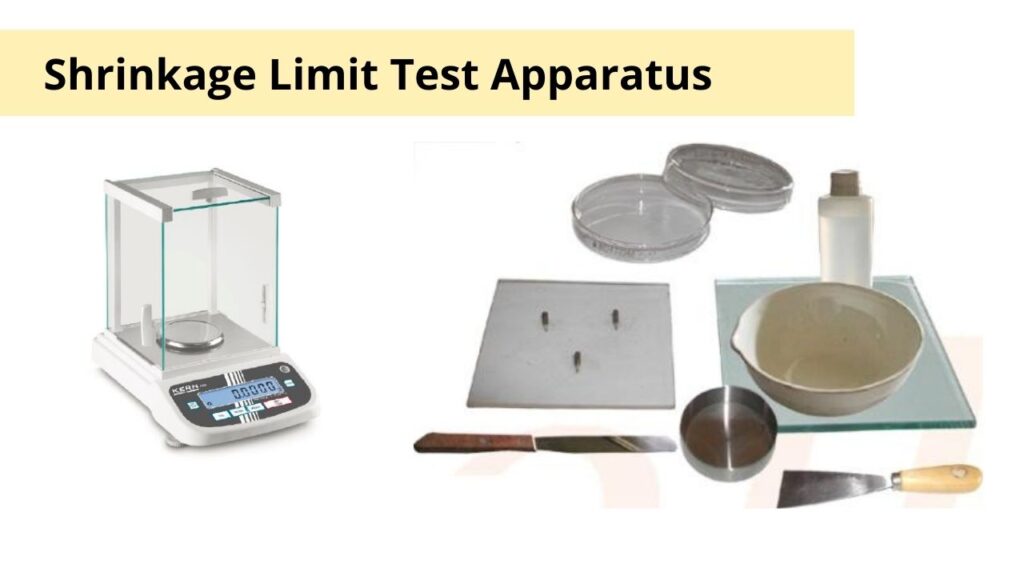
Shrinkage limit test Apparatus
Also Read: What is Monolithic Construction Technology | Advantages
- Shrinkage dish
- Evaporating dish
- Straight edge
- Glass cup
- Pronge plate
- Glass plate
- Spatula
- 425 micron IS Sieve
- Oven
- Mercury
- Balance etc.
Shrinkage Limit Test Theory
Shrinkage limit is defined as the maximum water content at which reduction in water content will not cause a decrease in the volume of a soil mass. It is the lowest water content at which a soil can still be completely saturated.
If a saturated soil sample of volume V, (as shown in the figure) is taken and allowed to dry gradually, its volume will go on reducing till a stage will come (up to volume V2) after which the reduction in the soil water will not result in further reduction in the total volume of soil sample.
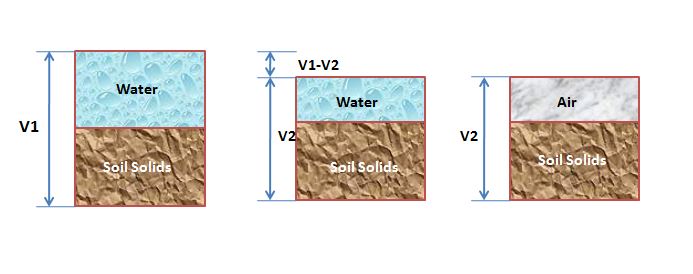
The water content corresponding to that stage is called as the shrinkage limit.
i.e. Shrinkage Limit = [Weight of water at the stage when sample ceases to shrink] / [Dry weight of sample.]
= [Total wt. of water – Loss of weight of water when sample ceases to shrink dry] / [Weight of sample]
= {(W-W2) – (V1-V2)rw} / (Ws) x100
Also Read: Plastic Limit and Liquid Limit test for soil
Shrinkage ratio is defined as the ratio of a given volume change expressed as a percentage of dry volume to the corresponding change in water content above the shrinkage limit expressed as % of the weight of oven-dried soil.
Shrinkage Ratio = {((V1-V2)/Vd)/(W1-W2)}
= (((V1-Vd)/Vd)/(W1-W2)) x 100
Where,
- V = volume of sample (initially) at water content W1
- V2 – V1 = volume of sample at water content W2.
Also, Shrinkage Ratio = (Wd) / (Vd x rw)
= (Vs) / (V2 x rw)
Volumetric shrinkage or volumetric change is defined as the decrease in the volume of soil mass when the water content is reduced as the percentage of the dry volume of soil mass when the water content is reduced from a given percentage to the shrinkage limit.
Linear shrinkage (L.S.) is defined as the decrease in one dimension (length) of a soil mass expressed as a percentage of the original dimension (length) when the water content is reduced from a given value to the shrinkage limit.
Ls = (1- (Length of oven-dried specimen / Initial length of specimen)) x 100
Also Read: Precast Concrete Vs Site cast Concrete
Shrinkage Limit Test Procedure
- Take about 100 gm of the soil sample from a thoroughly mixed portion of the material passing through 425 microns IS sieve.
- Take about 30 gm of soil sample in evaporating dish and mix thoroughly with distilled water till the voids are filled in completely.
- Determine the weight of an empty shrinkage, dish (W1) Coat inside of shrinkage dish with a thin layer of grease or oil to prevent adhesion of soil. Fill the paste in the shrinkage dish in three equal layers.
- Find the weight of the shrinkage dish with wet soil and note it down as W2.
- Dry the sample gradually first in the atmosphere for 24 hrs and then in the oven at temperature 105° C to 110° C to ensure no crack in a sample.
- Find the weight of shrinkage dish plus oven-dried soil and note as W3.
- Take out the soil cake from the shrinkage dish; keep the empty shrinkage dish in a stainless steel cup to preserve overflowing mercury during filling the dish. Find the weight of shrinkage dish with full of mercury (W4).
- Fill the glass cup to overflowing with mercury and remove excess mercury by pressing the glass plate with three sponges firmly over top of the cup, collecting the excess mercury in a suitable container. Place the cup, filled thus with mercury in the evaporating dish taking care not to spill any mercury from the glass cup, and place the oven-dried soil pat on the surface of mercury in the cup. Then carefully force the pat under the mercury by means of the same prongs and press the plate firmly over the top of the cup. Take the displaced mercury from evaporating dish, find out the weight of the dish with that mercury, and note as Ws.
- Make necessary calculations as tabulated in the observation table.
Precautions taken during Shrinkage limit test
- In the shrinkage limit test (Part – A), the amount of water required to obtain desired consistency may equal to or slightly greater than the liquid limit and in the case of plastic soils.
- It may exceed the liquid limit by as much as 10 percent. Also while pressing the dry cake by glass plate; no air should enter underneath the cake.
- For the linear shrinkage test (Part – B), the water content shall be approximately 2 percent above the liquid limit of the soil.
- The soil-water mixture should not be wet enough to allow the segregation of the large particles to the bottom of the mould.
- If a specimen cracks badly or breaks such that measurement is difficult, the test should be repeated at a slow drying rate.
Practical Utility of Shrinkage Limit Test
The concept of shrinkage factors of cohesive soil is useful in evaluating the behavior of slopes of dam and cuts particularly relating to the possibility of development of cracks in earthwork.
Reference: IS 2720 (part – 6)-1972

I am a Professional Civil & Structural Engineer having more than 4 years of experience in Engineering, Procurement and Construction industry. Here i sharing the latest updates of EPC Projects and Construction News.