

In this article, we explained lab test procedure of the plastic and liquid limit test. Theory behind the plastic limit and liquid limit test, What is the aim of PL nad LL test, Apparatus, Procedure of Liquid limit and plastic limit test, and so more.
Table of Contents
Aim of plastic limit and liquid limit test:
The object of the experiment is to determine the liquid limit and plastic limit of expansive nature soil.
Apparatus and Materials:
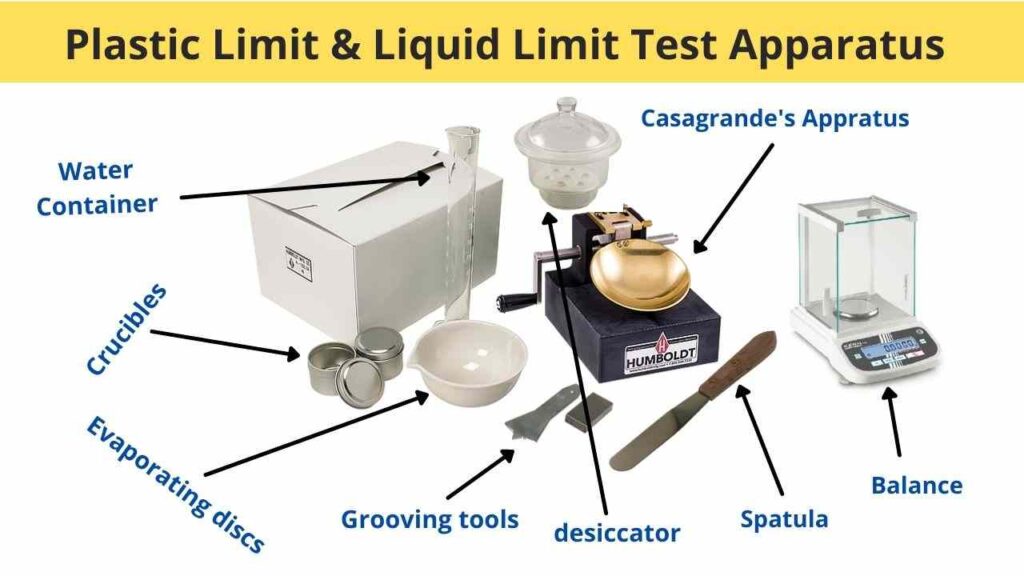
- Casagrande’s standard liquid limit device,
- Grooving tools
- Evaporating discs
- Spatula
- Balance accurate to 0.01 g.
- Crucibles to determine water content.
- Electric oven (thermostatically controlled),
- Wash bottle containing distilled water
- Glazed glass desiccators
- 425-micron sieve etc.
Theory of Plastic limit and liquid limit test:
The consistency is generally measured by Atterberg’s system which recognizes four stages,
- Liquid
- Plastic
- Semi-solid
- Solid
A fine-grained soil such as clay will pass through these stages as the moisture content changes. Refer fig. below:
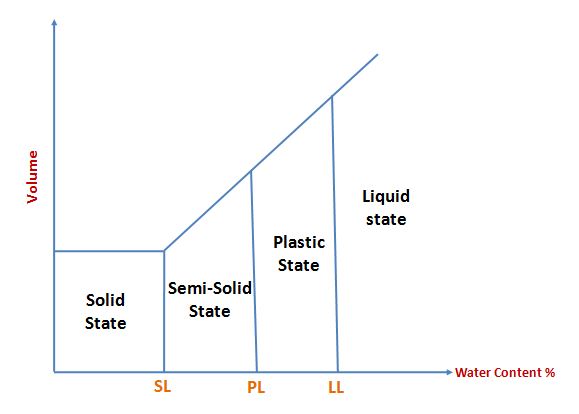
When sufficient water is added to a soil mass, the result is a mass that will deform freely without breaking. The soil has no shear strength.
Also Read: Causes of Foundation Failure
Liquid limit:
During the drying process, initially, the liquid state reaches a consistency at which the “Soil ceases to behave like a liquid and begins to exhibit the behavior of a plastic deformation but no friction under constant load).
At this stage, the shear strength begins to appear. The small shearing strength against flowing can be measured by a standard liquid limit device.
The water content at this stage is called Liquid Limit (L.L).
In other words, it is water content corresponding to the arbitrary limit between liquid and plastic state of consistency of soil.
Plastic limit:
As the drying process continues, the soil volume and the plasticity decreases.
The plastic state reaches a consistency at which the soil ceases to behave as plastic and begins to break apart is Plastic Limit (P.L) the water content corresponding to an arbitrary limit between the plastic and semi-plastic state of consistency of soil.
It is defined as the minimum water content at which a soil will begin to crumble when rolled into a thread approximately 3 mm diameter on a glazed plane glass plate.
Shrinkage limit:
Finally, the water content at which the soil ceases to shrink is denoted as the Shrinkage Limit (S.L.).
In other words, shrinkage limit is defined as the maximum water content at which a reduction in water content will not cause a decrease in the volume of the soil mass.
Also Read: Foundation in Black Cotton Soil
Procedure of Liquid Limit Test :
- Take about 30 to 40 gm of given soil passing through 425 microns IS sieve in evaporating disc.
- Add water to form a paste. Leave the soil for sufficient time so that water may permeate throughout the soil mass.
- Take a portion of the paste with the spatula and put it into the cup of a liquid limit device which is adjusted for 10 mm blows.
- Cut the vertical groove with the standard grooving tool. (Casagrande’s tool for clays and ASTM tool for sandy soils).
- Give blows by rotating crank of the standard device at the rate of 2 rotations per seconds and note the no, of blows for 12 mm closer of the groove at the bottom.
- Collect a representative slice of soil with the help of a spatula for water content. determination.
- Repeat the process changing the consistency for the different numbers of blows varying from 15 to 35 and find the Moisture content of corresponding samples collected.
- Plot the graph of Moisture content against no. of blows on semi-log paper having no. of blows on X-axis with log scale and water content on Y-axis with arithmetical scale.
- Find the liquid limit as the water content for 25 no. of blows from the graphs.
Also Read: Types of Pile Foundation
Precautions should be taken during liquid limit test:
- See that the closing of groove is by flowing of soil and not. by sliding
- Clean the cup every time for subsequent observation.
Procedure of Plastic Limit Test:
- Take about 8 gm of plastic soil, make a ball of it, and roll it on the glass plate with the palm of the hand with just sufficient pressure to roll the mass into a thread of uniform diameter throughout the length. Continue rolling until the thread starts crumbling. At the time of breaking or crumbling if the diameter is bigger than 3 mm, add slight water and knead it again to roll.
- Continue this until the thread just crumbles at 3 mm diameter.
- Collect the crumbled soil thread in the crucible and keep it for water content determination.
- Repeat the process for two or three determination to get the average value of P.L.
Practical Utility of Plastic limit and Liquid limit test:
The practical significance of the Liquid limit and Plastic limit lies in their ability to reflect the types and amounts of clay minerals present in the fine fraction.
The high value of Liquid Limit and plasticity index indicate that the soil has a high percentage of clay and colloidal sizes of more active type minerals, and such soil possesses a poor foundation or traffic load-bearing capacity.
Also, the results of the test are of great use for the classification of soils, design of footings, and predicting consolidation settlement.
References : IS-2720 (Part-5)-1985 (Method of test For soil)

I am a Professional Civil & Structural Engineer having more than 4 years of experience in Engineering, Procurement and Construction industry. Here i sharing the latest updates of EPC Projects and Construction News.